Thursday, January 30, 2014

“Radiant Orchid” Nail Art - Featuring Essie Play Date

Thursday, January 30, 2014
Hi everyone!

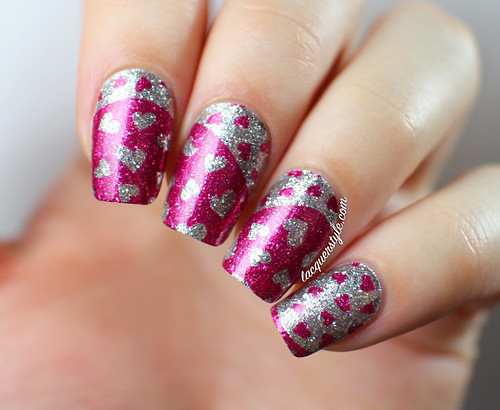
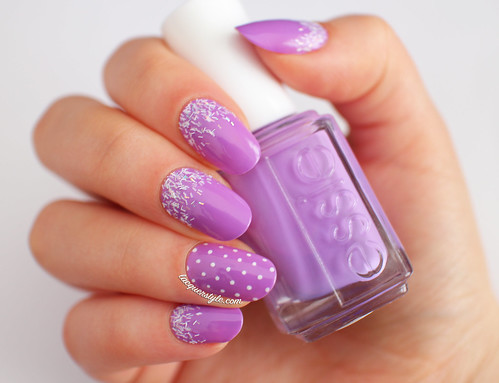
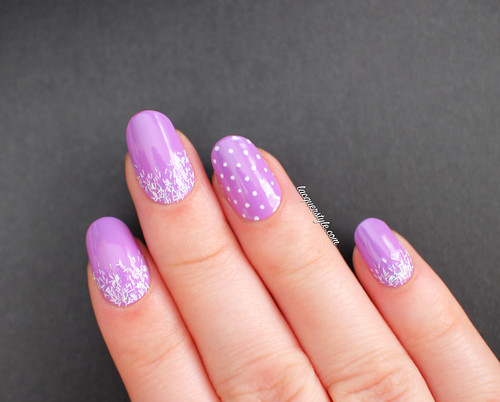
You will probably be surprised by this post if you missed what I posted on Instagram yesterday.  Well, I changed the shape of my nails!  I’ve been going slightly more squoval recently, and I was just about to file them down, but then I decided to try an oval shape for a change.  I’m actually enjoying them more than I thought I would, since I’ve never had anything but square or squoval before, and they should be fun to play around with; I’m hoping to try some different designs that may not have worked on my squares. :)

For my nail art today, I chose Essie Play Date as the base.  I’ve been meaning to create some Pantone “Radiant Orchid” themed nails for while now, so I went through all of my purples, and Play Date stood out amongst the others.  It’s a really lovely medium purple that leans a bit pink, and it applies effortlessly in two coats.

IMG_0045-2

IMG_0060-1

IMG_0064-1

I added Essie Peak of Chic (white and holographic bar glitter) as a glitter gradient on top of Play Date, and I think they are so cute together.  Peak of Chic can be quite hard to use over solid colors because the white bar glitters kind of clump together, but I’m loving the way it turned out as a gradient.  To compliment the white glitter, I added some polka dots on my ring fingers using Essie Blanc.

IMG_0116-1
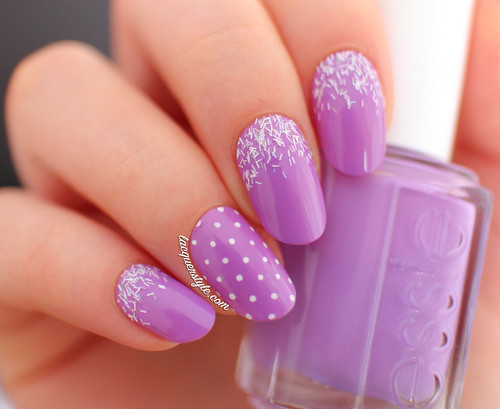
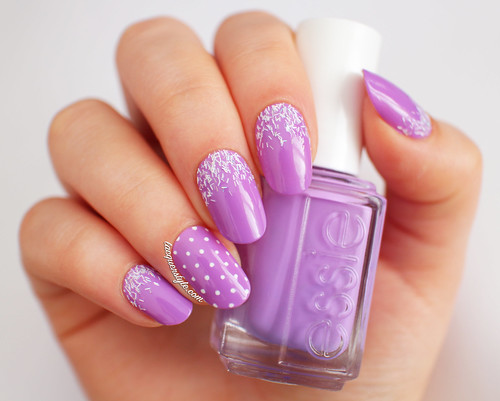
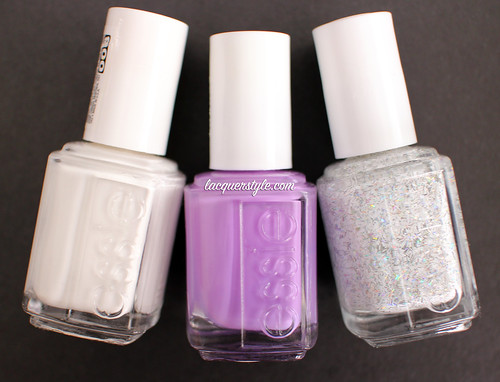
Essie Blanc, Play Date, and Peak of Chic

IMG_0086-1

IMG_0092-2

So, what do you think of the new shape?  I would love to hear your honest opinions.  My nails grow extremely fast, so I don’t know how long they will last, but I’m pretty happy with them at the moment!


Thank you for reading!  And, be sure to check out my giveaway on Instagram, if you haven’t already. :)


Kristin


Connect with me:
Instagram  |  Twitter  |  Facebook  |  Pinterest

Follow on Bloglovin


Monday, January 27, 2014

Incoco Sweet Surprise (Valentine’s Day 2014) Collection: Double Date Nail Appliqués

Monday, January 27, 2014
Hello everyone!

Incoco recently released their new Valentine’s Day 2014 Sweet Surprise Collection, and I have my first review from the collection for you today.

The Sweet Surprise Collection is very girly and pink, perfect for Valentine’s Day, and I love pink, so the designs are right up my alley.  The first design that caught my eye as I opened the package is called “Double Date”, and they are super sparkly!

IMG_8921-1

IMG_8801-1

IMG_8814-1

IMG_8814-2

The base of the “Double Date” appliqués is a combination of silver and pink glitter, with a bit of holographic glitter, and there are different sized hearts scattered all over them.  They were very easy and quick to apply, just like previous Incoco appliqués that I have tried, and the combination of silver and pink is beautiful.

IMG_8837-2

IMG_8856-1

The rest of the collection is just as sweet, from a sugar-spun design to one that looks like sprinkles on a cupcake; I just love them all, and can’t wait to wear the rest of them!

IMG_7588-1 
Sweet Surprise, Yours Truly, Double Date, Made With Love, and Love Spell

IMG_7611-1


Incoco nail appliqués retail for $8.99, and the Valentine’s Day 2014 Sweet Surprise Collection is available now at www.incoco.com.


Have you ever tried Incoco nail appliqués?  What are your thoughts on the Sweet Surprise collection?


Thank you for reading! :)


Kristin


Connect with me:
Instagram  |  Twitter  |  Facebook  |  Pinterest

Follow on Bloglovin


Thursday, January 23, 2014

Gold Studded Nails

Thursday, January 23, 2014
Hello everyone!

Sorry I haven't been posting recently, everything has been a bit crazy.  I just thought I would quickly share with you what I've been wearing on my nails for the past week or so, and I am still wearing them as I type this actually.  They have held up so well, and I have really enjoyed wearing them!

IMG_9317-1

IMG_9362-1

IMG_9354-2

I started with a base of two coats of a-England Lancelot, which is actually a dark burgundy (not black), even though it looks black the majority of the time.  I used two coats of Essie Hors d'oeuvres as my accent nail, which is a mix of silver glitter and gold shimmer, and seems to have a strange purple shimmer to it at certain angles.  I thought it was a bit boring as it was though, so I decided to sponge on China Glaze Mingle With Kringle with some plastic wrap, one of my favorite techniques, especially when I want something quick but still really beautiful to look at.  And finally, I finished the look with a bunch of gold studs!

IMG_9644-1
Essie Hors d'oeuvres, a-England Lancelot, and China Glaze Mingle With Kringle

IMG_9468-2

IMG_9342-1


I hope you like them, and thank you for reading! :)


Kristin


Connect with me:
Instagram  |  Twitter  |  Facebook  |  Pinterest

Follow on Bloglovin


Monday, January 13, 2014

OPI Mariah Carey Holiday 2013 Collection Nail Art

Monday, January 13, 2014
Hello everyone!

My prize from the Nail Polish Canada Holiday Nail Art Challenge arrived last week, and I am still amazed by it all.  Thank you so much to those of you who voted for me throughout the challenge, it made my Christmas and birthday absolutely amazing, and I can't thank you all enough! <3

I received some duplicates, so I made sure to set aside a few things from my prize to add to a giveaway I've been planning for a while now.  You should be hearing about it very soon! :)

There were 12 beautiful polishes from the OPI Mariah Carey Holiday 2013 Collection in the grand prize, which I had been dying to get my hands on, so I wanted to use as many as I could at one time.  I went with a mix & match featuring one of my favorites from the collection, Cute Little Vixen.

IMG_7906-1

I started with my index nail, applying two coats of My Favorite Ornament, a lovely antique gold flake glitter with a slight texture (I did not apply top coat).  My middle nail is one coat of Ski Slope Sweetie, which I made matte, then over it I created some angular shapes with the brush of Cute Little Vixen (not tape).  On my ring nail, I have added a few of the circle glitters from I Snow You Love Me on top of two coats of Cute Little Vixen to resemble polka dots, similar to what I created here.

IMG_7930-1
My Favorite Ornament, Ski Slope Sweetie, Cute Little Vixen, and I Snow You Love Me

IMG_7914-2

IMG_7847-1

This is always one of my favorite color combinations to wear (if you couldn't already tell from previous posts), and I was a bit sad to remove them! 


Let me know what you think of them, or what you would like to see on Lacquerstyle next, and thank you so much for reading! :)


Kristin


Connect with me:
Instagram  |  Twitter  |  Facebook  |  Pinterest

Follow on Bloglovin


Tuesday, January 07, 2014

My Birthday Nails - Chanel Pearl Drop

Tuesday, January 07, 2014
Hello everyone!

This post is going up a bit late, due to internet troubles.

Yesterday was my birthday, and strangely, I didn’t have much inspiration for nail art, so I went with something simple and elegant on my nails.  I ended up using a few polishes I’ve never used before, which is always a good thing, I would say!

IMG_6729-1

I applied two coats of Chanel Pearl Drop, which is a lovely alternative to a nude polish.  It has a beautiful golden shimmer, and really does look like a pearl.  I could have probably used a third coat, but I added Chanel’s Mat Velvet Top Coat which gives it a really nice finish, so I don’t mind that there’s a bit of visible nail line (of course, it’s less visible in person anyways).  My accent nail is two coats of China Glaze I’m Not Lion; I can’t even believe I’ve never used this glitter before, because it’s so gorgeous, and I think it compliments Pearl Drop perfectly.

  IMG_6841-1
Chanel Pearl Drop, China Glaze I’m Not Lion, Chanel Mat Velvet Top Coat

Here is Pearl Drop with one coat of the Mat Velvet Top Coat (my photos don’t really do it justice!):

IMG_6793-1

IMG_6798-1

Thank you for reading! :)


Kristin


Connect with me:
Instagram  |  Twitter  |  Facebook  |  Pinterest

Follow on Bloglovin


Monday, January 06, 2014

White Negative Space Mix & Match Nails

Monday, January 06, 2014
Hello everyone!

I created some black and white negative space nail art on my thumbs last week (which I never ended up posting), and I loved them so much that I was inspired to create some more negative space nails.

This time, I decided to keep them all white, and I am really happy with how they turned out. :)

IMG_6131-2

For the base, I used one coat of Julep Gwyneth (a sheer pink) and one coat of Nicole by OPI Imagine If… (a fine holographic flake shimmer in a clear base).  Then, I used one of my favorite white polishes for nail art, Nars Ecume, and a 5/0 brush from Michael’s to create each pattern.

IMG_6266-2
Nicole by OPI Imagine If…, Julep Gwyneth, Nars Ecume, 5/0 brush from Michael’s

I painted a simple grid on my index nail, hearts on my middle nail, and tiny polka dots on my pinky.  On my ring finger, which turned out to be my favorite nail, I painted a houndstooth print;  I’ve tried houndstooth once before and it wasn’t exactly right, but I’m really proud of it this time.

I’ve been wearing these nails for several days now, so I thought I would take a few photos of both hands as well!

IMG_6685---1

IMG_6449-1 

I hope you all enjoy these as much as I do, and thank you for reading! :)


Kristin


Connect with me:
Instagram  |  Twitter  |  Facebook  |  Pinterest

Follow on Bloglovin


Lacquerstyle.com © 2014