Showing posts with label a-england. Show all posts

Friday, October 03, 2014

#WNAC2014 - October / Fall: Leaves

Friday, October 03, 2014
Hello everyone!

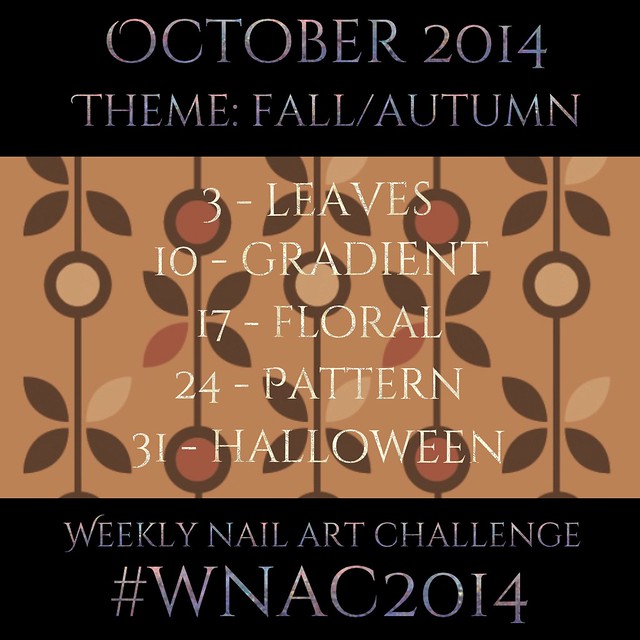
Today is the start of a new nail art challenge, that two fellow artists (@missbellatracey & Simply Nailogical) and I have come up with.  It is a weekly nail art challenge, which is much more manageable for me than the daily ones.  For October, the theme is of course Fall, and you're all welcome to join us in the challenge if you'd like.  You can check out the schedule down below, if you're interested!

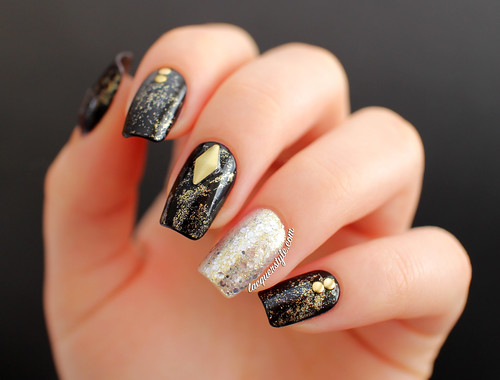
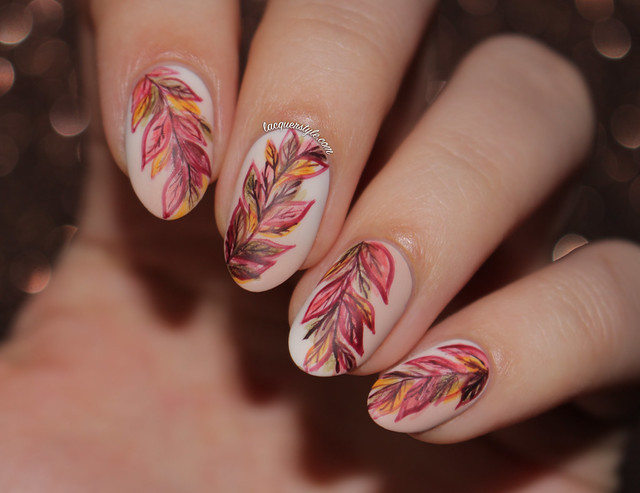
The first day is leaves, so I've created some artsy color changing leaves for today's nail art.

IMG_4208-1

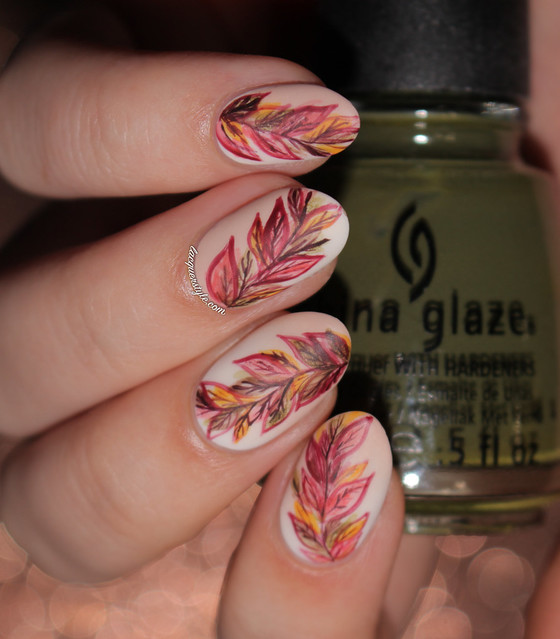
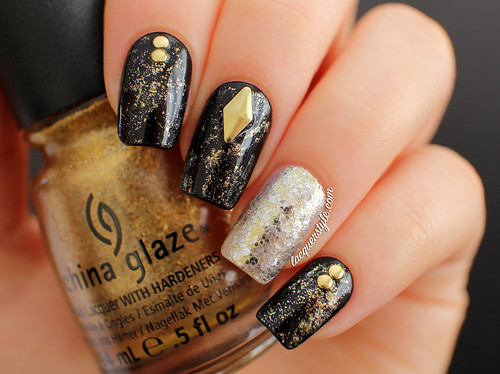
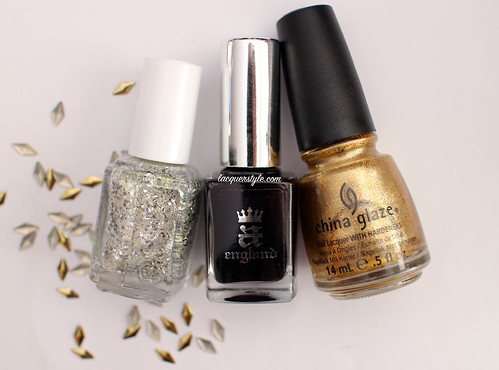
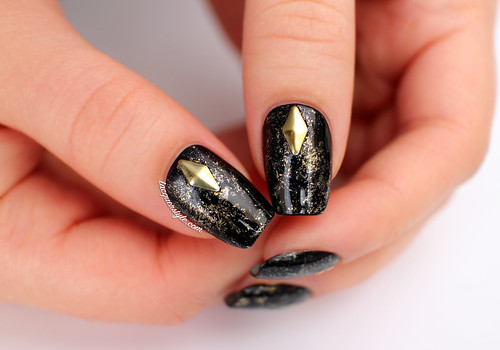
I started with a subtle diagonal gradient using ivory and nude polish (Love & Beauty Ivory and Julep Pippa).  Then, with a "watercolor" technique similar to my video here, I created the base of the leaves in several different Fall colors (Square Hue Scorched Summer & Swahili Charm, China Glaze Westside Warrior, Julep Parker and Finger Paints Bauhaus Burgundy), and finally added the leaf details using a England Lancelot and my 18/0 Round brush from Michael's.

IMG_4216-1

IMG_4196-1

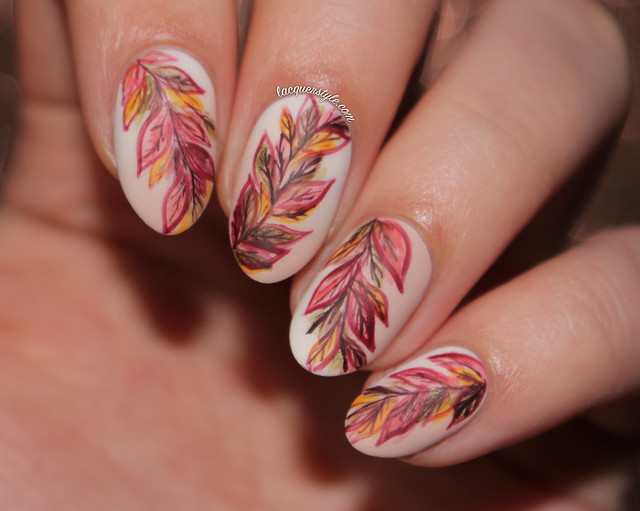
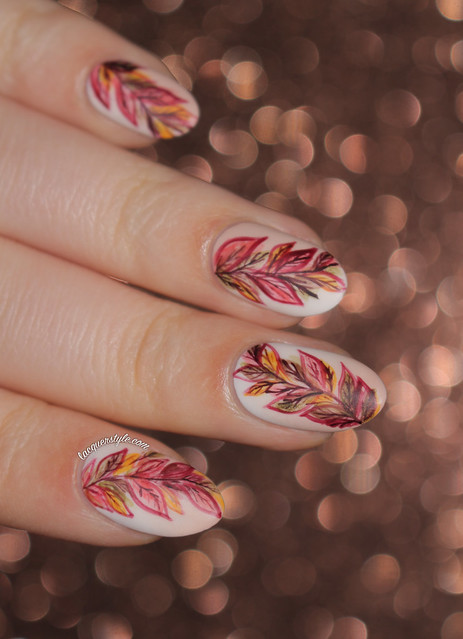
The gradient sadly got kind of washed out in the photos, but it was very noticeable in person.  I finished the design with JINsoon Matte Maker top coat, which created a really nice effect to the leafy details.

IMG_4195-1

Here's the October schedule for the Weekly Nail Art Challenge:

#WNAC2014 - October: Fall

I hope you all will join in with us in the challenge, and if you do, then I can't wait to see what you come up with!  I think it's going to be a great month for nail art; there will be new posts for each one (I promise this time!) and you might even get several new videos from me as well, so I'm excited!


Thank you for reading! :)

Kristin


Connect with me:
Instagram  |  Twitter  |  Facebook  |  Pinterest

Follow on Bloglovin


Tuesday, September 02, 2014

31 Day Challenge 2014 - Day 1: Red

Tuesday, September 02, 2014
Hello everyone!

I have decided to try to attempt the 31 Day Challenge again this year (and try to actually complete it this time).  I'm hoping that it will keep me posting more on my blog, since I've been really slacking for a while now.  I think that it helps to have a theme for some inspiration as well.  Today was the first day, so I created some gradient rose nails for the red theme.  I created a quick photo tutorial as well, which you can view down below!

IMG_0501-1

IMG_0463-1

I won't go into too much detail since you can read the steps below, but I was definitely inspired by all of the Rouge Louboutin inspired mani's I've seen lately, with the gorgeous black and red gradient mimicking the bottle.  For my version, I decided it needed a bit of holo of course, so I went with piCture pOlish O'hara as my base.  I really love the simplicity and gothic quality about them.

IMG_0471-1

IMG_0476-
Marc Jacobs Jezebel, Essie Trombone, Julep Hayden, piCture pOlish O'hara, a-England Lancelot, and Winstonia Store #00 brush

IMG_0482-1

IMG_0460-1


Here's the tutorial if you would like to recreate them:

Untitled

1.  Apply one coat of red nail polish, or one with holographic shimmer as I have shown.

2.  Grab a sponge and paint a few layers of black, a deep burgundy red, and your base color directly onto the sponge.

3.  Sponge lightly onto the nail.  I had to do this a few times to deepen the black.

4.  Using a peach nail polish, begin the rose near the cuticle of the nail.  I like to start with a centre dot and a half circle sticking out from the side.  Make sure you leave some black area peeking through to give some depth to the rose.

5.  Paint similar petal shapes around the centre.  I like to make some squiggly and pointy edges to create a more realistic shape.

6.  Keep creating petals until the rose is the size you like.  If it helps, you can also see me create the same rose shape in a previous video I made here: Negative Space Rose Nails

7.  Using a red polish (similar to your base color), and a nail art brush, paint directly on top of the peach lines leaving a tiny space at the outer edge of each petal.

8.  Once you have all of the red filled in, wait a few minutes, then add your top coat.   Have fun!


Thank you all for reading!  If you're also doing the challenge, let me know, as I would love to follow along with your posts as well! :)


Kristin


Connect with me:
Instagram  |  Twitter  |  Facebook  |  Pinterest

Follow on Bloglovin


Sunday, April 20, 2014

Baroque Quilt Inspired Nails

Sunday, April 20, 2014
Hello everyone!  I hope you all had a lovely weekend.

I posted these nails on Instagram last week, which were inspired by the quilt you can see in the background of the photos.  I've actually had the idea to create these nails for a while now, but I've been in such a mood to wear green lately that they were just perfect.

IMG_9823-2

I started with a white base, using two coats of Cult Nails Tempest.  Then, I painted a wide green stripe across my nails using Barry M Key Lime Gelly.  Using my nail art brush (La Corneille 18/0 Round), I painted three black stripes across the end of my nail.  I didn't use tape for any of the stripes / lines (I was asked that question a lot on Instagram).  For some reason I always end up messing it up with tape, and freehand just works much better for me.

IMG_3353-1
Cult Nails Tempest, Barry M Key Lime Gelly, A-England Camelot, Cirque Colors Sani

IMG_9806-2

Originally, I was going to paint the black pattern (a-England Camelot) on multiple nails, but after my middle nail was finished I got a bit lazy (it was really late at night when I created these).  I ended up adding a quick baroque (or damask?) accent over two coats of Cirque Colors Sani before completing the look with top coat.  Now that I'm looking back on them, I'm actually glad I didn't finish all of the nails, and I'm definitely happy with how they turned out!

IMG_9765-2

I loved wearing this design, and I got a lot of comments at work about how they looked like stamps or stickers.  It's always funny to see people's faces as I tell them they are hand painted!


Thank you all for reading, as always! :)


Kristin


Connect with me:
Instagram  |  Twitter  |  Facebook  |  Pinterest

Follow on Bloglovin


Thursday, January 23, 2014

Gold Studded Nails

Thursday, January 23, 2014
Hello everyone!

Sorry I haven't been posting recently, everything has been a bit crazy.  I just thought I would quickly share with you what I've been wearing on my nails for the past week or so, and I am still wearing them as I type this actually.  They have held up so well, and I have really enjoyed wearing them!

IMG_9317-1

IMG_9362-1

IMG_9354-2

I started with a base of two coats of a-England Lancelot, which is actually a dark burgundy (not black), even though it looks black the majority of the time.  I used two coats of Essie Hors d'oeuvres as my accent nail, which is a mix of silver glitter and gold shimmer, and seems to have a strange purple shimmer to it at certain angles.  I thought it was a bit boring as it was though, so I decided to sponge on China Glaze Mingle With Kringle with some plastic wrap, one of my favorite techniques, especially when I want something quick but still really beautiful to look at.  And finally, I finished the look with a bunch of gold studs!

IMG_9644-1
Essie Hors d'oeuvres, a-England Lancelot, and China Glaze Mingle With Kringle

IMG_9468-2

IMG_9342-1


I hope you like them, and thank you for reading! :)


Kristin


Connect with me:
Instagram  |  Twitter  |  Facebook  |  Pinterest

Follow on Bloglovin


Tuesday, December 31, 2013

New Years NOTD, featuring Enchanted Polish Dime Piece

Tuesday, December 31, 2013
Happy New Year everyone!

I created some simple but blingy and beautiful nails for tonight.  They put me in a really happy mood. :)

IMG_5685-2

IMG_5732-1

I used the totally amazing Enchanted Polish Dime Piece (two coats) on my middle and ring nails.  I think it must be the most holographic polish in my collection now, but I am still wondering how it compares to one of my most wanted polishes, Chanel Holographic (does anyone have a comparison??).

IMG_5603-1

My index nail has one coat of a-England Camelot, topped with one coat of Enchanted Polish To Die For, which is seriously to die for.  And lastly, my pinky is two coats of Elevation Polish Mont Blanc, with one coat of Orly Prisma Gloss Silver.  I also added a little black stud to tie it all together.

IMG_5860-1
a-England Camelot, Orly Prisma Gloss Silver, Enchanted Polish Dime Piece, Enchanted Polish To Dir For, Elevation Polish Mont Blanc 

IMG_5625-1

IMG_5819-1

I think they are perfect for the New Years, and I just can’t stop staring at the holographicness of them!


Hope you all have a lovely New Year, and thank you for reading! :)


Kristin


Connect with me:
Instagram  |  Twitter  |  Facebook  |  Pinterest

Follow on Bloglovin


Thursday, December 05, 2013

Red & Black Lumberjack Plaid Tutorial

Thursday, December 05, 2013
Hello everyone!

I created some red & black plaid nails last week and got quite a few requests for a tutorial on Instagram.  I did actually film the original ones, but I decided to scrap the video because the lighting was off.  Instead, I created a photo tutorial (or pictorial) for you all.

If you missed my original post for these nails then you can view it here!

So, onto the tutorial!

  Red & Black Plaid Nails Tutorial

1. This tutorial is very simple; it only requires a black polish and your color of choice.  You must use a jelly or sheer polish for your color for the best effect though!  I chose red, and for this tutorial I used Essie Garnet.  The black is Orly Liquid Vinyl.

2. Apply one coat of your base.  It doesn't matter if it's a bit uneven or streaky because we will be adding a few layers.  Tip: At this point, you could also tape off your cuticles if you are using a red or color you know will stain your cuticles.  You don't want to spend ages cleaning up after, I made that mistake the first time! :P

3. Paint vertical lines in black.  I painted two, but depending on the size of plaid you want, you may want more.  I just used the polish brush from the bottles, but if you are more comfortable you could use a striper or even tape to create perfect lines.

4. Create a grid by painting horizontal lines in black.  You may need more or less depending on the length of your nails or size of plaid like the previous step.

5. Now, using your red (or other) jelly, paint vertical lines overlapping some of the black.  I painted one down the center, and one on either side of the black vertical lines.

6. Then, paint horizontal lines the same way as the previous step.  I did four red horizontal lines, so I ended up leaving the little 6 black opaque squares you can see in the photo.

7. Clean up around your cuticles with some remover and a cotton swab or brush dipped in acetone (I used both.)

8. Add top coat and your plaid nails are complete! 


I hope you all enjoyed this quick tutorial, and let me know if you have any other questions.

You can always share your recreations with me by tagging me (@kgrdnr) in your photo on Instagram, or showing me on Twitter or Facebook (yes, I am now on Facebook!).

Thank you for reading! :)


Kristin


Join me on my other social networks:
Instagram  |  Twitter  |  Facebook  |  Pinterest


Thursday, November 28, 2013

Red & Black Lumberjack Plaid Nails

Thursday, November 28, 2013
Hello!

I've been wearing some simple plaid nails these past few days.  I love the classic "lumberjack" red & black plaid, and I had an idea to create them a few weeks ago.  My first attempt was kind of a fail, but I decided to give them another go, and I'm really happy with them this time!

Lumberjack Plaid Nails - Essie & a-England

I only used two polishes for this design, and no nail art brushes or tape, so these were very quick to do.  The black is one of my favourites (a-England Camelot), which is super opaque, but what made this plaid work so well is the use of a red jelly (I used Essie Fishnet Stockings).

Lumberjack Plaid Nails - Essie & a-England

To create the plaid, I started with just one coat of red.  This design is all about layering, so the base doesn't have to be perfect.  Using the black I made a grid (two vertical lines, three horizontal), then with another layer of red I painted vertical and horizontal lines overlapping some of the black areas so they would appear faded, just like you would see on a plaid shirt.

IMG_2204-2

Lumberjack Plaid Nails - Essie & a-England

What do you think of these plaid nails?  I really enjoyed wearing them, especially in this weather.  They looked so nice with a big knit sweater and boots!


Thank you for reading! :)


Kristin


Follow me:
Instagram  |  Twitter  |  Beautylish  |  Pinterest


Saturday, September 14, 2013

31 Day Challenge - Day 10: Gradient Nails

Saturday, September 14, 2013
Gradient Nails was the theme for Day 10 of the #31DC2013.

I'd probably wear some variation of gradient nails everyday if I could.  They are so easy and always look pretty, especially with a bit of glitter.


This time I went with a super fast and simple gradient using China Glaze Blue Sparrow and a-England Camelot.  These nails were a pain to photograph, so I'm not very happy with the photos, but I figured I would post them anyways.  This gradient had so much depth in person because of the jelliness of Blue Sparrow, and I loved wearing them.


Thank you for reading!


Kristin


Sunday, September 01, 2013

Vintage Newspaper Nails & An Apple Nail Art Tutorial!

Sunday, September 01, 2013
A subscriber on YouTube requested to see some "Back to School" nails, and even though I don't attend school anymore, I thought this would be a fun design to attempt!

The first thing that came into my mind was an apple, but I didn't want to just create some simple apple nails, so I went with the apple on my thumb as an accent nail.


For the remaining nails, I created some newspaper nails.  I have always wanted to try this technique, but I never have any alcohol in my house, so I ended up using plain tap water after doing some research.  As always, I like to give a simple technique a bit of a twist, so I gave my nails a vintage look.  I'm really happy with how they turned out, and I have been wearing them all week long!


Colors used: Cult Nails Tempest, Ciate Cream Soda, Dior Gris Montaigne, Zoya Maura


And finally, here is the video to get this look:


Hope you all like it!  

Thank you for reading! :)


Kristin


Friday, August 02, 2013

Chrome Gradient Leopard Print Nails

Friday, August 02, 2013
I'm a bit behind on my blog, so you have probably already seen these (sorry!).  I actually posted them last week on Instagram, but I have many more photos to share so I hope you all don't mind! :)

I wanted something fun for the weekend, and I noticed that it's been quite a while since my last leopard print mani, so the idea came to me after I decided to do a gradient of gold and silver chrome on my nails.  I'm not totally happy with my leopard print this time, but I really love how the design as a whole turned out, and I think the mixed chromes with the white accents are perfect for summer!


I started with a gradient using CND Silver Chrome and Gold Chrome.  For a bit of added sparkle, I topped the gradient with piCture pOlish Majesty (my new favorite on top of everything!).  The accent nail (and leopard print) is Cult Nails Tempest.  To tie it all together, I added a small gold stud on the white accent nail.


I hope you like them, and thank you for reading! :)


Kristin

  
Lacquerstyle.com © 2014