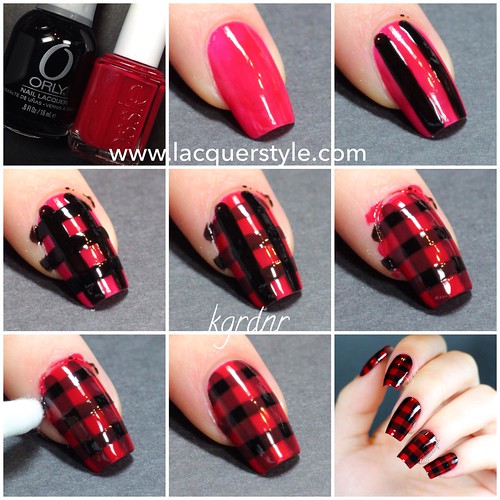
I created some red & black plaid nails last week and got quite a few requests for a tutorial on Instagram. I did actually film the original ones, but I decided to scrap the video because the lighting was off. Instead, I created a photo tutorial (or pictorial) for you all.
If you missed my original post for these nails then you can view it here!
So, onto the tutorial!
1. This tutorial is very simple; it only requires a black polish and your color of choice. You must use a jelly or sheer polish for your color for the best effect though! I chose red, and for this tutorial I used Essie Garnet. The black is Orly Liquid Vinyl.
2. Apply one coat of your base. It doesn't matter if it's a bit uneven or streaky because we will be adding a few layers. Tip: At this point, you could also tape off your cuticles if you are using a red or color you know will stain your cuticles. You don't want to spend ages cleaning up after, I made that mistake the first time! :P
3. Paint vertical lines in black. I painted two, but depending on the size of plaid you want, you may want more. I just used the polish brush from the bottles, but if you are more comfortable you could use a striper or even tape to create perfect lines.
4. Create a grid by painting horizontal lines in black. You may need more or less depending on the length of your nails or size of plaid like the previous step.
5. Now, using your red (or other) jelly, paint vertical lines overlapping some of the black. I painted one down the center, and one on either side of the black vertical lines.
6. Then, paint horizontal lines the same way as the previous step. I did four red horizontal lines, so I ended up leaving the little 6 black opaque squares you can see in the photo.
7. Clean up around your cuticles with some remover and a cotton swab or brush dipped in acetone (I used both.)
8. Add top coat and your plaid nails are complete!
I hope you all enjoyed this quick tutorial, and let me know if you have any other questions.
You can always share your recreations with me by tagging me (@kgrdnr) in your photo on Instagram, or showing me on Twitter or Facebook (yes, I am now on Facebook!).
You can always share your recreations with me by tagging me (@kgrdnr) in your photo on Instagram, or showing me on Twitter or Facebook (yes, I am now on Facebook!).
Thank you for reading! :)
Kristin


Great job hun! Love it and will certainly try this out.
ReplyDeleteThank you Lindsay! I would love to see it! :)
DeleteHi Kirsten! I love your nails & tutorials! I will definitely be doing some. Anyway, I'm here from WPNFF Critique Bootcamp and I for one couldn't believe I wasn't following you (now I am)! I really don't have anything to complain since your blog to me is perfect...photos, writing and navigation! Just keep up the good work! ツ
ReplyDeleteHi! Thank you so much for the lovely comments! :)
DeleteHi Kristin! I found your blog through the WPNFF Bootcamp series and you have amazing talent! Your nail art is flawless and I will be trying this look very soon :)
ReplyDeleteThe only thing I would say is you may want to number your photos to correspond with your instructions just to make it super easy to follow.
I've added you to my list of blogs I follow, keep it up!
Hi Tam! Thank you very much! I will make a note of that for future tutorials :)
DeleteThank you so much! I would love to see it! :)
ReplyDelete